J is for Jewellery

AtoZ2019J

You can find information about the Blogging from A to Z April Challenge here or read the rest of my A to Z posts by following this link.

Today’s post for the Blogging from A to Z Challenge is the letter J, the topic I have selected to write about is Jewellery.

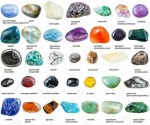
I own a LOT of jewellery; from watches, bracelets, bangles, rings, necklaces, earrings, ear cuffs, anklets, toe rings and other body jewellery.  I have jewellery made from beads – wood, glass, plastic and shell, feathered jewellery, jewellery made with shells, sparkly jewellery, big statement pieces and simple, silver pieces.  Some of it gets worn daily and other pieces I dust off for special occasions.  Today I am going to go through how I wear some of it and what sort of things I wear those pieces with.

Simple jewellery I class as fairly plain pieces, such as fine silver chains with a small pendant on, plain bracelets, and elegant rings get chosen for occasions where I would be dressing more formally, such as interviews, black tie events, or where I would be wearing an outfit that is dressy.  I like to wear a necklace with a single pendant on it, small stud or hoop earrings and a single ring.  I wear my watch and a single bracelet or cuff on the opposite wrist to my watch.

For day wear I will wear a few necklaces layered up – a choker style, a chunky pendant and my favourite silver chain, a few bracelets and my favourite rings.  This look seems to work well with most of my clothing.

For a party or other event where there isn’t a formal dress code I choose my jewellery depending on what I am wearing.  If it is summer and I am wearing a maxi dress and sandals I often reach for more eccentric jewellery – a shell choker, something feathered or tasselled and throw on a heap of casual beaded bracelets.  I choose bright earrings to complement or contrast with my clothing or makeup and make sure that they are fun and casual.

If I wear a v neck top that is plain then I layer my necklaces and will choose a longer necklace style that reaches past the v of my top.

For a plain top I will choose a bright necklace in a contrasting colour or something sparkly that will catch the eye and add interest to my outfit.

If my outfit has pattern or detail around the neckline or all over then I go for something that is more plain or a beaded style that complements the colours of the top.  Often I will choose earrings and bracelets in similar tones to the necklace.

If I choose a t-shirt or round neck top then I like to layer necklaces and play around with different textures, layering beads with chains and cord styles.

In winter when it’s all about thick jumpers and being cosy I like to wear more chunky jewellery with neutral tones.  I like to wear a short necklace over a polo top, under a v neck jumper; this can help to break up block colours and adds a bit of fun to a plain outfit.

I have spoken a bit about earrings and I have a few rules about which earrings to select.  I have 3 piercings on each ear and wear a pair of studs in 2 sets of holes and the other ones I change depending on what I a doing or where I am going.  I wear studs or plain, small hoops for any formal events and for any other occasion I will either match my earrings to similar tones or colours in either the outfit or to together jewellery that I am wearing.

I have my lip pierced and I always wear a ball stud in it.  I did wear a hoop of a bit but I found that I was forever clipping it with my tooth which wasn’t ideal.  I also have my nose pierced and mostly wear a fine silver hoop in it.

I love to wear ankle bracelets; I have a dainty silver chain with a heart on it that I wear most of the time though in the summer I will wear a woven, friendship band style bracelet and if I am wearing flip flops or thonged sandals I like to wear a toe ring on each foot.

Whatever jewellery you choose to wear, have fun with it and let it complement your outfit!

What sort of jewellery do you wear?  Do you have any styling tips?

I is for Interviews

AtoZ2019I

You can find information about the Blogging from A to Z April Challenge here or read the rest of my A to Z posts by following this link.

Today is day 9 of the Blogging from A to Z April Challenge and todays topic is Interviews.  Interviews can be fairly daunting things to attend, let alone prepare for, there are so man things to consider from what to wear, how to greet the interviewer, what questions will be asked, how to prepare answers, even things like how should you sit and how to present yourself.  So, in this post I am going to share some help, advice and tips that I have learned along the way and from the many, many interviews that I have attended.  Hopefully, by applying some of these things you will feel less anxious about the interview and maybe, even, enjoy the whole process.

  1. Research the company.  These days most companies have a website and various other social media channels which make it easy to research just what the company does.  Look for information about its history, when it was set up, it’s core beliefs and values, how many employees it has and which sector it sits in.  Having this knowledge is useful as it shows that you have an interest in the company from how it started to how it got to where it is now.
  2. Research the job role.  While the job role may be generic, for example administration assistant, find out exactly what that means to that company.  Job roles can vary greatly from one company to another so it is vital that you research just what the company expects from you in the role you have applied for.  More often than not, you should be able to find out this information from the pack you received when applying for the job, however, looking online and doing a search should give you an idea of the types of activities you will be expected to carry out on a day to day basis.  Knowing this information can help you build some relevant questions to ask your interviewers.
  3. Research your interviewers.  Often, when you get invited to attend an interview, you will be given the name or names of the persons interviewing you.  It is worth spending some time looking into who they are and what their business backgrounds are, where they started, how long they have been with the company and any other useful information.  Not only will this give you an idea of who the interviewers are but it can help you to generate some interesting questions to ask them.  You should be able to find out information about your interviewers via the company website or from their LinkedIn profiles.  This step will also show that you are not only interested in the company and the job but in the people who you will be working with.
  4. Write down any questions that you may have from the first 3 points.  This is essential.  Do not rely on your memory to try to remember any questions.  have a notepad or paper beside you when researching the first 3 points and make note of questions as you go.  You can always go back and review or change the questions afterwards.
  5. Find out the dress code for the company.  Knowing the dress code for the company will help you in your choice of attire for the interview.  Have a look for the company on Facebook and see what images have been shared of their workers.  Make a note of what they are wearing, is it super formal and mostly black and white or are the clothing choices bright, modern and cool?  Once you know this you can incorporate the companies overall style into your interview outfit.  I would always suggest dressing smart but adding a hint of the company style into your outfit too, for example a skirt and jacket but instead of a shirt, maybe a bright, plain fitted t-shirt under the jacket, or a patterned dress under a formal jacket.
  6. Prepare your outfit and accessories.  Make sure that your outfit is clean and freshly laundered and pressed.  Check that your shoes are clean and any scuffs are fixed, and if necessary get them re-soled or re-heeled.  Check that your bag is clean, dust free and empty!  Write down any questions you have into a smart notebook, and make sure that you have a pen that writes.
  7. Pack your bag with interview necessities.  I like to pack my bag with only the things I may need for the interview.  My packing essentials are mints, tissues, deodorant or perfume, lip balm, hair brush, bottle of water, smart pens, notebook, spare tights.  Your list may differ slightly but it is best to only pack the things you may need, there is nothing worse than reaching into your bag for something and pulling out a load of unnecessary items, or worse, spending valuable time rummaging around to find one thing.
  8. Show up early.  I like to arrive to an interview around 15 minutes early.  This gives me time to park my car, find the interview place, go to the toilet, carry out any last-minute appearance touch-ups and gives me time to breath and calm myself.  These 15 minutes can make all the difference to your demeanour in the interview.
  9. Match your interviewers body language, posture and voice.  Watch how your interviewer sits and moves and mirror those gestures and postures.  By doing this you are encouraging feelings of trust and understanding.  Keep the same tone of voice as your interviewer, match the speed at which they talk, and talk clearly.  Try not to be too lengthy in your answers, shorter and more concise answers are easier for your interviewer to follow and remember.
  10. Ask Questions.  In all interviews I have ever attended I have been asked if I have any questions.  The worst thing to do is not have any at all which is where our research from the first 3 points comes in handy, this is your time to show that you have an understanding of the company, what is expected of you and about your interviewers.  Try to ask at least one question from each – 1 on the company, one on your role and one about your interviewer or interviewers.
  11. Maintain eye contact.  When the interviewer is speaking try to maintain eye contact, and use open body language which will help you seem focused and interested.  When you are speaking try to maintain eye contact or look from interviewer to interviewer.  This shows confidence and helps to build a bond of trust with your interviewers.
  12. Say thank you.  once the interview is over remember to thank the interviewers for their time and the opportunity to have an interview/be considered for the role.  Shake hands and, if not already mentioned, ask when it is likely that you will hear from them.

Do you have any other tips that you could add?  Have you used any of the tips I have listed and how have they helped?

H is for Hair

AtoZ2019H

You can find information about the Blogging from A to Z April Challenge here or read the rest of my A to Z posts by following this link.

I always dye my hair bright colours, I’ve been pink, blue, green, orange, turquoise, peach, red, magenta, purple, lilac and all shades and tones in between.  I’ve been dying my hair for around 20 years, and over that time I have had lots of questions about caring for coloured hair so, as todays Blogging From A to Z letter is H, I thought I would share a bit about my hair, dying it and caring for it afterwards.

***I am in no way a “hair expert” and these hints/tips are what I have learned through research and my own trial and error.***

***Please always read any dye or bleach instructions fully before attempting any home colouring and ALWAYS perform a skin and hair test at least 24hrs prior to using.***

When I decide to dye my hair I like to start with a base tone as light as possible so I always start with hair bleach.  I use Jerome Russell Bblonde Powder Bleach and 40 Vol 12% Cream Peroxide from the same range to lighten my hair.  I add the peroxide to the powder and stir through using a plastic tint brush in a glass bowl.  Before applying to my hair I add a generous amount of cheap hair conditioner to the prepared bleach.  I find that adding this in stops my hair from getting overly dry during the lightning process.  As my hair is naturally dirty blonde it doesn’t take long for the bleach to start working its magic and I find that after around 15 minutes it is ready to be rinsed off.  I would recommend checking on your hair every few minutes to see how well it is processing and never leave it on for more than 20 minutes.  Always follow the manufacturers instructions.

IMG_3464 Once the bleach has lightened my hair to the desired level I then rinse off the bleach with cool water.  I towel it dry and then apply Bleach London white Toner which helps to even out the tone of my hair to an almost platinum shade.  Once this has been left on for the time stated in the instructions I rinse it off, again using cool water and then towel dry.

Now comes the fun part, putting the colour onto your hair!

IMG_3468

I tend to use Bleach London Super Cool Colour dyes as it comes in an array of colours and take well to my hair and last quite a long time too.  They are semi-permanent colours and will fade over time but I have found these to fade evenly all over and the colour still remains pretty.  I have also used a few Pick & Mix Colours from Superdrug which also fade down really nicely.

The easiest thing I have found is to squeeze an amount of dye into a glass dish and apply to the hair-line with a dye brush before adding more dye directly to the hair using gloved hands and working through.  Once your hair is saturated with dye then get a length of cling film and wrap it over your head and hair before covering with a towel.  Leave it to sit for as long as is recommended in the manufacturers instructions before rinsing off with cool water.

IMG_3469

Once you have rinsed and towel dried, apply a deep conditioning treatment such as Bleach London Reincarnation Mask or a hair oil like Superdrug Coconut Oil with Argan and leave to sit on the hair for as long as you want.  Personally, I aim to deep treat my hair for around an hour.  This step will ensure that your hair is soft and manageable and will retain the colour for longer.

Tips to make your colour last.

  • To make the colour last longer I recommend always buying a second bottle of colour and each wash, add a bit to both the shampoo and conditioner as you use it.
  • Deep condition your hair once a week, again, adding a bit of dye to the conditioner, this will prevent your hair looking dry and becoming unmanageable.
  • Dry shampoo is your friend, where possible, use dry shampoo instead of washing.  I try to wash my hair twice a week when it has been coloured.
  • Use shampoo and conditioner formulated for coloured hair or use baby shampoo.
  • Try to avoid styling products.  I have found that hair spray especially, seems to suck colour from my hair.

When you want to change your hair colour it is important to fade your hair as much as possible before bleaching or re-dying.  In order to fade the colour you will want to wash your hair as much as possible, anti dandruff shampoo is really good at helping to fade dye!  By fading the colour as much as you can it will mean that, should you use bleach, you shouldn’t need to leave it on your hair for long.

If you want to change your colour without bleaching then think about what colour your hair is now and what colour you may want to end up with.  Transitioning from similar colours can be fairly easy and I have gone from pink to purple to turquoise without any need for bleach.

Here’s a few pictures of my hair over time!

This slideshow requires JavaScript.


G is for Gemstones (and crystals…)

AtoZ2019G

You can find information about the Blogging from A to Z April Challenge here or read the rest of my A to Z posts by following this link.

Today’s Blogging From A to Z letter is G and today I am sharing about my love of gemstones.

IMG_3433

I’ve always loved gemstones and from an early age I have been a collector of them, I was fascinated with how they looked and felt to hold.  My first gemstone was a piece of moss agate which, when you peered at it you could see formations that looked like trees and bushes.  My imagination used to run riot and I’d spend hours dreaming up scenarios involving being under water and of ethereal landscapes trapped in time, making up stories about the people and animals that could have lived in such places.

Over time, and as I grew up, my collection grew to include, not just tumbled stones, but several pieces of jewellery that incorporate gemstones (necklaces, rings, bracelets, earrings) and I started to read about the healing powers that the crystals held, how to care for them and cleansing and charging of them.

I find it really interesting how such a small stone can hold so much power and can help in so many different ways.  I carry around a piece of moonstone, hematite, amethyst and rose quartz with me daily, and wear a bracelet with turquoise beads on it, a moonstone ring and a necklace that houses a ball of rose quartz.

Moonstone is a really calming stone, and even when I can’t see it, knowing that I have it with me seems to help me to feel less anxious.  I carry a moonstone tumble stone with me in a small pouch and also wear a ring set with moonstone daily.

Hematite is a grounding stone which is also calming, it can aid in concentration which is really helpful for me as I find that at times my concentration is really low because of the medication I take.  I carry this stone in a pouch with me daily.

Amethyst is another calming stone which can help with headaches too.  It can also help to reduce stress and I like to hold this stone and sit quietly for a few minutes when I can feel the stress levels in my body starting to rise.  This is another tumble stone that I carry with me daily.

Rose quartz is one of my favorite stones.  It is the stone of love and can help to reduce any ill feelings you may have.  I wear this stone daily in a necklace and carry it in a pouch with me daily.

Turquoise is known for its healing properties but is also the stone of protection and communication.  I wear a turquoise beaded bracelet daily and it seems to give me more confidence when speaking and the ability to explain myself in a better way.

Below I have included some images of different gemstones that I found on Google.

If you are interested in gemstones and crystals let me know in the comments!

F is for Fountain Pens

AtoZ2019F

You can find information about the Blogging from A to Z April Challenge here or read the rest of my A to Z posts by following this link.

Today marks the 6th blog post as part of the Blogging From A to Z April Challenge and the corresponding letter is the letter F.  The topic for this post is Fountain Pens!

I can remember learning to write in school with a HB pencil and the promise of writing with a “real pen” once our handwriting was good enough.  While most kids in my class just dreamed of becoming one of the big kids and writing with any old pen, I always had ideas of owning my own fountain pen and writing with that.

The idea of having my own fountain pen came from my Dad and Grandad who both had beautiful handwriting and wrote with fountain pens, my Dad still, to this day writes with his trusty Parker pen.  Somewhere along the way, I came to believe that the key to beautiful handwriting was a fountain pen.

I can remember the first fountain pen I owned, my Dad presented it to me on my first day of Secondary School when I was 11.  It was a brushed chrome Parker pen, my Dad had bought a refillable cartridge for it and bottles of Quink Ink in Blue and Black and I felt so grown up.  The pen was a dream to write with and made my handwriting look so neat, I’m sure the belief that I’d had when I was younger was true.

img_1318

I don’t have that pen anymore but I do have several others in my collection which I love.  The latest addition is a Lamy Safari in Neon Lime which I use on a day-to-day basis for making notes in my planner and when I am at work.  I use the Lamy T10 (Special Edition Petrol Blue) cartridges in it.

My other go to pen is my Parker IM series in Dark Espresso.  This pen reminds me of the one my Dad gave me both in the way it writes and how it feels in my hand, though the look is totally different.  I use Parker Quink cartridges in this, usually the blue/black ink but I have been known to switch to black on occasion.

I know that fountain pens are not the most practical to use every day, they can be leaky, feather, shadow and a whole host of other problems, and I know, for certain tasks, there are other pens that are more worthy of the job, but for me there will always be something very special about writing with a fountain pen.

Do you use a fountain pen?

Just a reminder that there will be no Blogging From A to Z post tomorrow, Sundays are the only day the challenge does not run!  I will be back with the next post on Monday!


E is for Evening Skincare Routine

AtoZ2019E

You can find information about the Blogging from A to Z April Challenge here or read the rest of my A to Z posts by following this link.

The Blogging From A to Z April Challenge is in its 5th day and that means today’s letter is E!  Today I am going to be sharing with you my Evening Skincare Routine!

You can find information about the Blogging from A to Z April Challenge here or read the rest of my A to Z posts by following this link.

***This post contains affiliate links to products. I may receive a small commission for purchases made through these links.***

Untitled design(1)

My skincare routine of an evening is really different to my morning skincare routine and focuses on cleansing, exfoliation, face masks and rehydrating my skin.

My skin is fairly dry and flaky due to an underactive thyroid in part and also due to the office environment that I work in though my t-zone can be oily on occasion and I get stress related eczema around my nose and on my forehead too.  I get the odd breakout of spots and blackheads, this last week my skin has been pretty bad because of the weather.  I wear make-up every day that I am in work but when I am at home I don’t really wear any make-up unless I am going out or having friends around for an evening in.

In the evening I like to remove my make up using Dr Organic Rose Otto Cleansing Milk with my facial brush.  I like using my facial brush as it loosens all the make-up, dirt and dead skin cells gently whilst also improving the skin circulation, it is a really gentle way for me to exfoliate without being too harsh on my skin.  I follow this up with Dr Organic Rose Otto Toner which removes all traces of cleanser and leaves my skin feeling really refreshed and helps to prepare my skin for the next step in my cleansing routine.

I use my Garnier Pure Active 3 in 1 Clay Mask-Scrub-Wash 2 times a week as a face scrub.  I have been using this product for a few years now and really like that the scrub particles are made from pumice which makes it a more eco-friendly scrub than some others which use plastic micro particles.  The pumice is really fine and works wonders on the drier parts of my skin leaving my skin bright and soft and less prone to break outs due to the eucalyptus and salicylic acid ingredients.

On other days I use Calm Skin Soothing Facial Wash from Superdrug, using my hands to apply and Facial Sponges to remove with hot water.  This face wash really helps to calm my skin and is really gentle without any drying effects.

Once a week, after I have double cleansed my skin I use a face mask.  I prefer to use a clay mask and love Skintruth Equalising Face Mask (which I had as part of a skincare set).  This face mask is salon quality and I found out about the brand through the Beauty Therapy course that I undertook a few years ago.  This mask has been formulated specially for Oily/Combination skin and is perfect for evening out my skin tone and balancing the dry/oily areas of my face.  I use this mask when I feel that my skin is becoming unbalanced and more oily in my t-zone.  I also love N-Spa Skin Glow Mud Mask (which you can get in Asda) and will rotate use of this with the Skintruth mask.  This mask has a very similar effect on my skin and balances out the oily/dry parts of my face.

When I need a bit more moisture I really like Creighton’s Photo Perfect Get Ready Mask. (I bought mine in Asda but they don’t seem to have it available on the website, Creighton’s site have it here though).  This mask is a creamy/jelly mask and is not drying like clay based masks which is brilliant to use when I have super dry patches of skin that are in need of a lot of moisture.  I like to use this mask when I have a hot bath as the steam and heat from the bath really open up your pores and help the product to penetrate the skin.  This mask always leaves my skin looking healthy, glowing, moisturised and peachy soft.

I always remove face masks with my facial sponges and warm water and follow with Dr Organic Rose Otto Toner to remove any last traces of mask from my skin.

I like to follow-up with moisturiser and will use Nivea Soft after I have exfoliated or used a clay based mask.  This is a thick cream which absorbs well into my skin and, come the morning, my skin feels more hydrated.  I use Superdrug Calm Skin Overnight Face Mask once or twice a week and apply to the areas of my face that are starting to look dull and de-hydrated more than applying all over my face as I find this quite a heavy product for my skin, that said, it works wonders and sorts my dry skin, and eczema patches out really nicely!

I also use Superdrug’s Calm Skin De-Stress Balancing Facial Oil in place of a moisturiser, usually after I have used Creightons Photo Perfect Get Ready Mask as it adds an extra shot of moisture to my skin and keeps it looking calm and smooth.

***This post contains affiliate links to products. I may receive a small commission for purchases made through these links.***

D is for Decorating

This post contains affiliate links to products. I may receive a commission for purchases made through these links.

AtoZ2019D

You can find information about the Blogging from A to Z April Challenge here or read the rest of my A to Z posts by following this link.

Today’s Blogging from A – Z Challenge brings you the letter D and this post is all about decorating!

There is something really lovely, for me, about the whole decorating process, from choosing the colour scheme, the paints and finishing touches to actually starting the decorating process and then standing back and admiring your hard work once you have finished.  But, it doesn’t have to be all hard work, and you don’t need to decorate the whole room in order to refresh your decor, and you don’t always need to paint a wall or put up wallpaper in order to decorate either.  Heres some things you could consider when decorating…

Accent Wall or Feature

Painting or wallpapering one wall or accent feature of a room can refresh the decor really easily and quickly and there won’t be too much of a need to change furniture or soft furnishings much.  In my home I painted the recesses between the chimney breast, the archways in my dining area and the arch between the two rooms.  I painting the back wall part of the archway and chimney breast recesses one colour and then the side wall part another, contrasting colour.  This was quick and easy and required little time (or paint!) and was really cost-effective too.


You can see the back and side wall detail in the images above.  You could consider painting around windows or doors or even painting the backs of shelving units in order to introduce a pop of colour to your decor.

Tile Stickers/Decals

A simple way to update your bathroom or kitchen is to use tile stickers or decals.  These are really easy to apply and are usually either vinyl stickers that you peel and stick or decals that you soak in water and slide from the backing into place on the tile.  Both options are quick, fairly mess free and look really effective once in place.  There are lots of different sizes to fit most tiles so it is worth measuring the tile and then reading the product description carefully before purchasing.

Window Dressing

Windows let much-needed light and air into a room but that doesn’t mean that they have to be boring or plain.  Switching your curtains or other window dressing can breathe new life into a room without the need of paint and brushes.  Try changing dark, heavy curtains for lighter coloured ones in a softer fabric, adding nets or sheer voiles to your window instead of blinds.  If you have nets, try hanging them at a different height – nets don’t need to hang from the top of the window frame, you can hang them part way down the window so that they still offer privacy but let in more light at the top.  You could think about changing the hanging method of the curtains, instead of a curtain track change to a pole.  You could hang a pretty scarf, a piece of fabric or strings of beads over the pole to add interest to the window.

Photos and Pictures

Updating the photos and pictures you display is a really effective way of updating the look of a room.  You could theme your prints for the season or choose a black and white colour scheme.  There are lots of free photo editing apps and softwares available that let you change how a picture looks or try a print service like Photobox where you can edit the images and then have them printed and delivered straight to your door ready to frame.  Another way of updating your photos and images is to change the frames, try ornate frames instead of plain or vice versa.  You could even paint the frames in a colour of your choice to match in with other items in the room.

Soft Furnishings

Decorate your room using soft furnishings like cushions, throws or rugs.  Not only will this add a cozy factor to the room but it will add a visually attractive element too.  Play around with prints, textures, different fabrics and contrasting colours.  If you are really crafty and handy with a sewing machine you could make your own cushion covers really easily.  In the bedroom you could add a runner to the bed or different pillows for the bed or hang a tapestry to the wall.

Decorative Items

Adding ornaments and other decorative items can really bring a room up to date.  Try adding ornaments and other decorative items, like trinket boxes, candle sticks, dishes or vases, in similar tonal colours that clash with the wall colour.  You could remove items that you already have to create a feeling of more space or try adding items to add interest to selected areas.  Grouping similar themed items together on shelves is another visually attractive way of displaying items too.  Play around with how things are displayed and see how the items look together.

Lighting

Lighting can really change the mood of a room and how you view it.  Instead of always having the ceiling lights on why not introduce lamps into the room instead?  Changing the light shades or even the light fitting itself can really change the perception of a room too, instead of a singular bulb you could buy a fitting that has several bulbs instead, or change a fabric shade to one with glass beads attached.

Furniture

Changing your furniture can make a room feel really different, whether it’s getting a new sofa or table, adding a coffee table or removing a set of shelves.  You could have the sofa re-upholstered rather than spending on a new one, or try painting wooden furniture that you already have to update how it looks.  If you have a coffee table you could add a piece of coloured acrylic to the top of it or sandwich a pretty piece of wallpaper between the table surface and a sheet of clear acrylic.  One way I updated my desk was to use printed vinyl which was really cheap, quick and easy, and there are so many different patterns and colours that you can choose which would tie in with most interiors.

img_2932  IMG_1591

Room Layout

Aside from physically decorating the room this is probably the one that will have the most impact.  Think about how the room is currently laid out and the placing of the furniture, how the room is used and who by, think of different ways the furniture can be laid and move them around.  the lovely thing about this is that if you don’t like it then you can move it around again and again and its sure to be something people will notice!

Which decorating ideas would you try?


B is for Beauty

Today is the second post in the Blogging from A to Z April Challenge.  If you would like to read more of this series of posts you can find them here.

AtoZ2019B

You can find information about the Blogging from A to Z April Challenge here or read the rest of my A to Z posts by following this link.

Untitled design(13)

Beauty, so it has been said, comes from within but, sometimes, we all need a little help with the outside too in the form of makeup.  Today, as part of the Blogging from A to Z April Challenge, and today being the letter B I’m going to share with you the beauty items that I use.

Primer

Untitled design

I use the Flawless Original Primer by Barry M as my base for my make up application.  I really like this primer as it’s not sticky like some primers can be, it is really easy to apply and you only need a tiny amount.  When I use this my foundation applies really nicely and seems to last a really long time compared to when I apply foundation without a primer.

Foundation

Untitled design(1)

I currently flit between 2 different foundations W7 Genius Feather Light Foundation in Buff or Collection Illuminating Touch Foundation in Warm Vanilla, depending on the type of coverage I need.  The W7 foundation has a fairly light coverage, the consistency is really runny but it blends well and dries to a powder like finish which I love as I can save a little bit of time by then skipping powder.  I love that this has a dropper applicator that gives a precision application directly where you need it, I then blend with a beauty blender for the best finish.  The Collection foundation is a slightly darker tone but matches my skin tone perfectly.  This has a pump top and it has a nice, thick consistency.  I have found that you need to work quickly with this product as it seems to set quite fast though I do like to use a powder once I have applied the foundation just to make sure it is fully set.  I like that this product is a fuller coverage and is brilliant for when my skin is not looking its best.

Concealer

Untitled design(2)

I use Maybelline Dream Brightening Creamy Concealer in Light I love that this concealer is a pencil design and twists up from the base to access more product.  I use this before foundation under my eyes to illuminate the area and after foundation to conceal any spots or blemishes that may not have been covered by foundation alone.

Powder

Untitled design(3)

I use Revolution Luxury Banana Baking Powder to set my foundation.  I really like that this powder is really fine and helps to brighten my skin tone.  Under the twist off lid is a salt and pepper type of shaker lid and I sprinkle this onto a buffing brush before applying over my foundation.

Contour

Untitled design(4)

I use the Collection Highlight, Blush and Bronze Trio for contouring, though as you can see, I have hit pan on the blush so I only really use this pallet for the highlight and the contour now.  I really like that this product is easy to apply and blends really well.  I use a contour brush to apply the powder and an angled blush brush to apply the highlighter.  The only thing I dislike is that the highlighter seems to be a bit hard in places so it looks weird in the pan but it doesn’t seem to affect the application.

Blush

Untitled design(5)

Technically this is a highlighter and not a blush but the pink tone of this Revolution Rose Gold Ingot Highlighter lends itself well to being a dual purpose product – a highlighter and blush all in one!  This product is not too sparkly or overly shiny but adds a warmth and a golden tone to cheekbones which looks really pretty.  I love using this product on bare skin and with foundation, either use makes me look really healthy!  And this is the third purchase of this product I have made!

Highlighter

Untitled design(6)

This highlighter pallet, Revolution Ultra Cool Glow, is my favorite to reach for when I am going out for the evening.  I love the variety of different coloured highlighters and like to match them to my eyeshadow colour or the colour of the outfit I’m wearing.  A little goes a long way with this product as they are super pigmented and bright.  And, I have a confession to make, when I bought this product I didn’t realise it was a highlighter pallet, I was looking for an eyeshadow pallet that I could take with me to a festival and grabbed this quickly in a rush… but, I do love a product that has a dual purpose and these highlighter colours have made really nice eyeshadows too!

Eyeshadow

Untitled design(7)                   Untitled design(8)

These eyeshadow products are my go to shadows.  The first is the Make Up Academy pallet in Poptastic (which seems to be discontinued though the Silent Disco Pallet seems to be very similar….), the second are loose powders from the Sugar Skull Collection by Concrete Minerals (I have the full set of these and also the Zombie Girl Collection)  These shadows seem super bright in the pan and pots but all have a really buildable colour, blend really easily and you can create so many different looks with each collection.  I don’t always wear these together, sometimes I use a grey or silver shade as a base and add a pop of colour along the socket line or combine 2 or 3 different shades to create a super colourful smokey eye.

Eyeliner and Mascara

Untitled design(9)

I like to use different mascara and eyeliner depending on the look I am going for.  Day-to-day I tend to use George Va Va Volume Mascara – Black as it doesn’t tend to flake or smudge and just enhances my lashes a bit.  It is also really easy to remove which is a plus on week nights!  I like using Model Co Eye Define Pencil – Black for a softer eye look and this pencil is perfect.  It is soft and doesn’t drag the skin, is really easy to smudge out if I want a softer, more subtle look or can be left as it is for a more defined look.  I like to use Collection Extreme Coloured Lengthening Mascara – Black if I am going to be going out after work or on the weekend if I am out as it really defines my eyes and makes me look more awake.  And it is true to its word – it really does add length to the lashes with just one swipe!  And for a more defined, cat eye look I really love Essence Superfine Eyeliner Pen – Black as it is a felt pen design and is has a really accurate, precision application which is just what you want for a sharp eyeliner look.

Fix

Untitled design(10)

I really loved this product but it was discontinued a while ago.  I was really lucky to snag myself a few of these from Amazon not too long ago but I’m down to this last bottle.  Collection now do another spray for setting make up with called Primed and Ready Make Up Fixing Spray which I am considering getting once I run out of this.  This spray is fab for fixing make up in place once you have finished applying it, the handy spray pump ensures that the product mists finely over the skin and covers well.

Lipstick

Untitled design(12)

Rimmel London Kate Moss Lasting Finish shade 107 is one of my favorite shades of lipstick.  It is not too dark or light, can pull any make up look together and the shade is good for day or night.  I really like the formula, it is creamy and feels moisturising, it lasts a fair few hours and doesn’t seem to bleed or feather.  I really like all the Kate Moss lipsticks and own a few darker shades that are perfect for evenings.

What are your go to beauty/make up products?