

The hallway in my house had laminate wood flooring which hadn’t been laid very well, was a bit battered and never seemed to look clean which always irked me somewhat. I really wanted to cover it with something as I was unable to remove it due to being rented accommodation.
I looked everywhere for a hall runner rug that would fit the 4 meter 10cm length and that would also fit width ways. The hallway starts off wide at the door and becomes narrow toward the foot of the stairs which made it awkward to find something suitable that would work well. The cost of the cheapest rug that I found was around £80 and came in really mundane solid colours – brown, grey and a golden colour, and most of the others I found I didn’t really like the pattern or colour of in a higher price bracket. There was nothing that I truly loved that fitted my style, that is until I started thinking about other types of flooring.
My first thought was carpet tiles as they were pretty cheap to buy and easy to fit too but, being a hallway I thought that might be a bit impractical with dirt being bought in from outside. I then thought about vinyl flooring as it is hard-wearing and can be cleaned really easily but the patterns that were available were not really anything that I liked. I wanted something bright, fun, easy to install, easy to keep clean, and even easier to replace if I needed to for whatever reason, it also needed to fit my budget. It was when I started to rethink over getting carpet tiles that a thought occurred to me… I knew what would fit my specifications perfectly and would be a pretty unique choice for flooring…kids soft foam play area tiles!
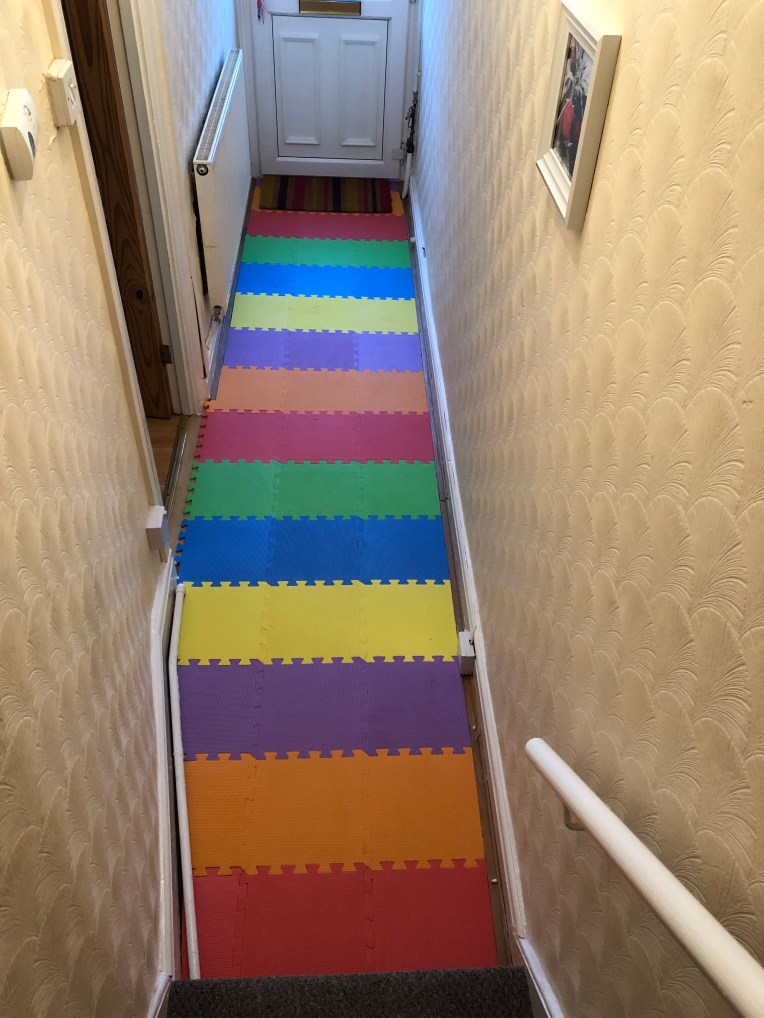
This is the outcome! I ordered these from here. When they arrived I opened up the packets and went about sorting them into colours before starting on laying them down.
I prepped the floor by sweeping and hoovering to get up every last bit of dust and dirt, I didn’t want to cause any further damage to the laminate underneath so this was a vital step.
I then chose the colour scheme I wanted, choosing to place the coloured tiles together to create a stripe effect and placed the first tile at the foot of the stairs and worked my way back towards the door. I then removed the first tile I had laid and cut one of the edge flat, removing the “teeth” before placing it back down and shuffling the tiles up so the cut edge butted up against the rise of the step.
The next cut I made was the tile to go against the door. Once I’d got this row in I was able to work my way back up towards the stairs and remove the teeth from the side closest to the wall and move the tiles into place. I then added the next row which just needed the teeth removing from both ends.
The third row was the trickiest as I needed to cut down some of the tiles to fit the shape of the wall so that the tiles fitted snugly without any room for movement. To do this I took each tile, laid it over the tiles that were there and made marks where the teeth and tile met. The tricky part to this is to remember to make the marks on the opposite side of the tile to where you are measuring otherwise you will end up with the cut going in the wrong direction… so mark the left side of the tile to be cut with the right side of the tile that is already in place. Be sure to put the tile fully against the wall before making the mark too!
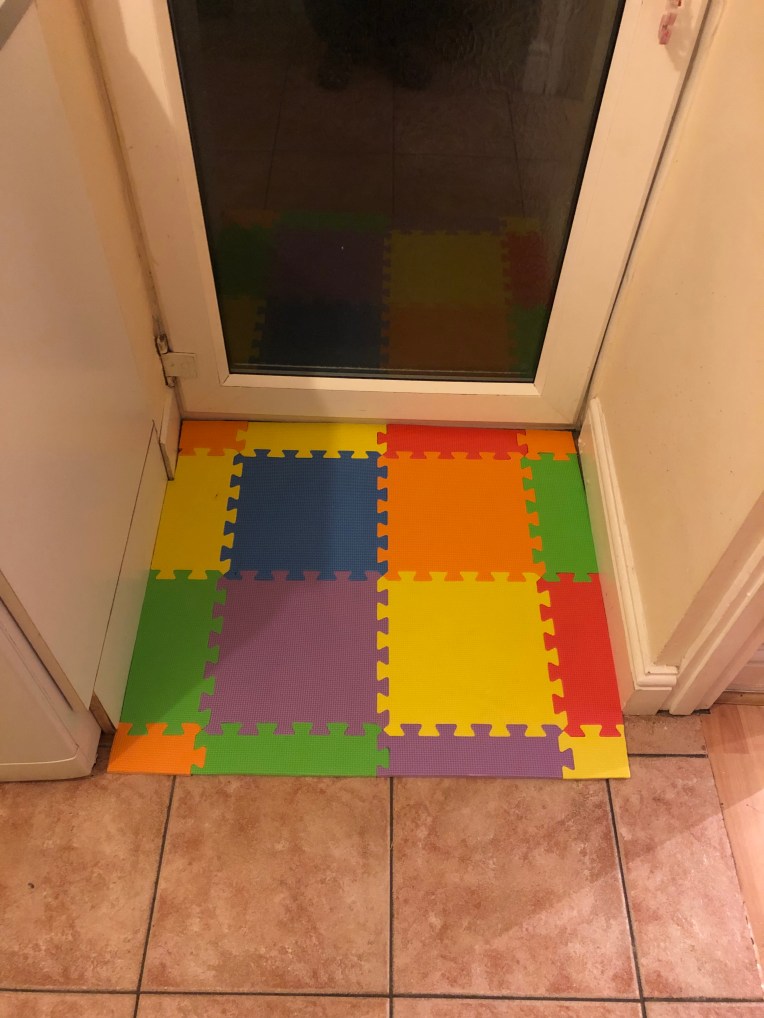
Once all the tiles were in place the only thing I needed to do was to finish the edge near the doorway, this was fairly simple as I was working with a straight edge so only needed to take a measurement and cut a straight line. I did have to go around a pipe but that too proved to be fairly easy to navigate… once Id cut the tile to the right size I laid it down and made a mark where the cuts needed to be to fit the tile around the pipe, then using scissors I made a small cut to each mark, then refit the tile to see if the cuts were deep enough to accommodate the pipe before removing the tile and making the last cut. I then re-fitted the tile.


I had left over tiles and decided to use these to make a back door mat in the same way!
What do you think of my flooring idea? Is it something you would try in your home?
