Why I Need a Blog Planner

You may have noticed from my post “Preparing for 2019” that I have 2 planners set aside for my blog, in this post I will explaining more about them and why I need them in my life.

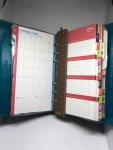
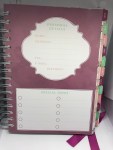
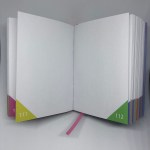
First up is my Gemma Correll Ohh Deer project book planner.

img_0217                                                img_0219

As the pages are undated and marked out with sections for “Day/Month”, “Notes”, “To Do/Done” and a “Doodles” section this planner lends itself beautifully to being my content and ideas book.  I use the “Day/Month” section to write in a title for my post along with a rough date for the post which helps me to keep track of ideas for posts.  Sometimes this may be the only thing I fill in if I’m in a bit of a hurry or think of something to write about when I’m in the middle of doing something else. I use the “Notes” section to write a bit about what I want to post including ideas and any other information that I want to include.  The “To Do/Done” section I fill in after I have written out my ideas for the post, it will include things that I need to do in order to get the post actually written and will include a list of things like “take photos of x, y, z…. Upload photos, links for materials, write post, publish…” I can tick off tasks as they are done and helps me to stay on track with the post and not get to overwhelmed with what needs doing or missing off things and overlooking them.  This planner for me is the most important tool for my blog as it’s where the ideas are generated and kept, and while I may not use the ideas for a while I will always have ideas ready for posts in the future.

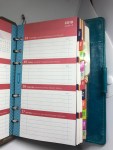
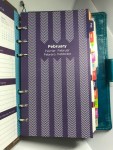
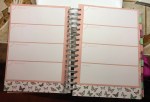
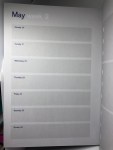
The second planner I have for my blog is the Bright Side 2019 diary.

With its handy monthly overview page and its week on a page format it will be easy for me to schedule posts and check off when they are published.  I can carry this around in my bag at all times so if I think of a post that I’d like to write I can pencil it in and write a short synopsis of the idea in the week to view section.  I can refer to it if I want to write a post and I’m away from home, my blog content and ideas planner and my computer.  I have the WordPress app on my phone and am able to post blogs wherever and whenever I choose so this diary will be super helpful to me in 2019!  I can’t wait to start using it!

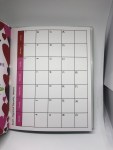
The other blog planner I have is a basic excel spreadsheet on my laptop which I have set up with a calendar that runs from sept 18 all the way through to the end of december 19 and I am currently using that to track which posts should go where and to space out posts that have a similar content so that my blog doesn’t get overloaded with too many posts on a similar topic.  I transfer all the blog idea titles from my content and ideas planner to the spreadsheet and break them down into different themes by highlighting the titles with different colours for different things, like all food orientated posts I colour green.  I then look at the list and decide on the placement of them in the calendar spreadsheet.  Once I have these posts in an order I’m happy with I will then transfer them over to the Bright Side diary so I have quick and easy access to all the scheduled content ideas.

In all, I need my blog planners to help me with generating ideas for posts, coming up with content, keeping on top of the to do list and not forgetting anything, and to help me see where I am with my schedule.  Maybe running 3 different planners for one blog seems too much but they all perform different tasks and help me in managing my blog and content.

How do you manage your blog schedule and content?  Do you use planners?

Preparing for 2019

I’m one of those people who can never seem to get excited about Christmas and tend to roll my eyes at the hoards of people that want to get into the Christmas spirit, haul out the decorations and put up the tree as soon as Halloween is over.  I even feel a bit disheartened when heading to the supermarket at the beginning of October and see the start of the Christmas stock being put out on shelves.  It all just feels like one massive hype for one day, and the preparation seems to go on longer and longer than before…its just so tiresome to me.

There are, however, 2 times in the year that I do look forward to and get a bit excited about (aside from my Birthday!) and they are when the shops start preparing for “Back to School”, around the first week in August, and October time, both for the same reason – new stationery and new diaries!  I am a sucker for all things stationery related, whether it’s a new notebook, pens, pencils or filing system and I’m an even bigger sucker for a new diary or planner.

To me, there is nothing better than the promise of starting a new year (whether it’s a school or calendar year) with a new, blank diary of sorts, that is waiting to receive your notes, ideas and plans for the year ahead.  I always get a feeling of wonder when I recieve a new diary, the year is so full of promise and things to come, a perfect way to schedule your future and make new dreams along the way.

I’ve used several kinds of diary in the past, from pre-printed tiny little things, to filofaxes of many different shapes and sizes, bullet journals and just plain note books in which to map my future in.  I’ve tried spiral bound books, lay flat designs, ring planners, the list is almost never-ending, and this year (I know… It’s still October…2019 is Monnntttthhhhsss away….) coming is no exception… I currently have 5 different diaries for different purposes that I am going to be using….


  1. Filofax Malden with Stripes Illustrated Inserts (this is an affiliated link, by clicking on it and purchasing I may get a small commission fee and no cost to you) as my carry around, everything organiser.  I love my Malden and that it is so portable and contains so much in it, I am able to carry around note paper, a diary, telephone numbers and addresses, sticky notes, all sorts of things!  And the size of it means I can use it for shopping lists, making notes on the go, having it out on my desk at work, it seems to fit everywhere.
  2. A planner similar to this (the one I purchased was in the sale, the layout is the same but the illustrations are butterflies) which will be my home planner.  I bought this with my Birthday voucher from my brother and his family for my Birthday, the layout of the pages caught my attention… there is a monthly overview, places for thoughts and ideas as well as space for plans each week, not to mention that the months are divided out with their own tabs (which always makes me happy!)  It is a fairly hefty planner which I wouldn’t like to carry around with me for several reasons – it would be too heavy, I’d need a huge bag all the time and I’d probably end up spoiling it.  I decided that this would be perfect for keeping at home, the monthly overview pages will be useful to track my household bills and appointments, the thoughts and ideas pages can be used to make notes of any meals I’d like to cook, things I’d like to see and places I’d like to go to, along with the weekly sections serving as household “to do”, reminders (like which bins get emptied and when), and chores that need to be done…)
  3. This hard backed book diary , of which I owned a previous years one and loved it!  This diary has a monthly overview and a 2 weeks to view layout which will be perfect as my blog and social media planner.  It is pretty small and takes up hardly any room so it is perfect for carrying around if necessary to jot things into.  The one I had a few years ago was used for the same thing and it was perfect for this job!
  4. This soft cover diary which I totally fell in love with on a recent trip to London.  I am unsure whether to use this one as my work diary (I like to keep a log of all the different tasks I do on a day-to-day basis in work) or as my “a few lines a day” personal journal though I’m swayed more towards using it as my personal journal, there are sections for “Must Do”, “Will Do Soon” and “Next Week” which would lend itself nicely to using as a personal journal or for work purposes, though the daily section, which is a week on a page format, might be a bit too small for all the tasks I usually complete daily in work.
  5. This teeny, tiny, cute diary that I bought partly because of how cute it looked but also to get me back into drawing every day.  I have several sketchbooks that I have started and never quite managed to get into a proper routine of using daily.  When I was in college and uni I drew pretty much all day, every day and I sort of miss it.  So, in purchasing this, I’m hoping that it will force me into a routine of at least doodling something each day and working on getting back the skills that have, not so much gotten lost, but maybe gotten a little rusty over time.
  6. THE BONUS DIARY… this is the one that I have owned for several years now and never used as I’ve been too worried about spoiling it or forgetting about it or whatever…I don’t really know…I love it.  I bought it from Ohh Deer and is by illustrator Gemma Correll though I can’t find it on the site anymore (there are other, similarly laid out versions here if you fancy similar…), its undated and has a to do/done check list, a doodle section and a notes section.  Technically, it isn’t really a diary as its undated…it’s more of a project book…and more to the point, I have a really good use for it this year…I am going to use it in conjunction with my Bright Side blog and social media diary 🙂  Its main function will be to plan out blog content, using the notes section to write a synopsis of the blog post, the to do/done section to track what I need to do in order to get the post published (like research certain things, take photos, upload photos etc) and the doodle bit I can use to plan the layout of the post and decide what goes where!

I’m itching to start the New Year already and start planning my year out but I have a tradition that I like to stick to and always look forward to once all the main festivities are over, and that is on Boxing Day and New Years Eve I will make myself a cup of hot chocolate (a dash of Baileys or kahlua optional), sit down in a quiet place, in my comfiest pjs with a box of chocolates and my favorite pens and start writing out my New Years Resolutions, filling in the information sheets, start making plans for the first few weeks of January and adding in all the celebrations that I have to look forward to like Anniversaries and Birthdays.


Happy Birthday To Meeeee!!!!!

Yesterday I turned 30 something…I never thought I’d see the day that I forget what age I am and always assumed that it was an old person thing, but I guess once you reach a certain age (over 30 in my case) it stops being something you define by a number, instead you are grateful that you are still here and experiencing life.  Age begins to not define you anymore, and fades into insignificance, instead we are measured on our ability and skills to do things, where we are in life and what we have achieved.  And I think I’ve achieved a lot in my life right up to this point but those achievements can be saved for another post.  Today I want to share with you my actual Birthday and what I got up to!

I woke up later than normal and had snuggles in bed with my dog Roxy, then I got up and had a shower, coffee and breakfast.  I received cards in the post from my brother Ben, his wife and my niece and nephew along with some really lovely drawings that they had done especially for me!  I phoned Ben and had a really lovely chat with him and spoke about my arrangements to go up there over the weekend, I can’t wait to go and visit them!!!!

My friend, Sam, came round at around 1:30pm to take me out to lunch.  He came baring gifts for me including a new candle and candle holder, a drawer unit for my bathroom, sweets, a cake and some other gifts, I felt really spoiled.

We headed to a local pub for lunch where we both had a main course and dessert, I was also treated to a bottle of wine at lunch which was a really nice treat!  After lunch we popped to Asda and bought a cake to share with my family then headed up to my parents house and spent a bit of time with them.  Mum and Dad bought me some car parts so I could get my car fixed – it had broken down the week before so their present was really useful to me!  Dad said he would fix it for me when he was able to!  I got to see my other brother Richard while we were at Mum and Dads house, he called in on his way back from work to wish me a Happy Birthday!

Sam and I came back here after seeing my Mum and Dad and we sat and chatted and watched a bit of tv before Sam left to travel back to his house (around 11:45pm) and I headed off to bed!

I had a really lovely day and am blessed to have friends and family around me that I could share my day with!

Upcycle Project – Dining Chairs (Part 3)

I have shared the first two parts of this project already, you can find the first post (about finding my chairs) here, and the second part (about preparing them and painting) here .  Todays post is about upholstering the seat part of the chairs.

I had decided to replace the seat part of the chair fabric with white vinyl and decided that I would replace the seat padding at the same time as the padding was fairly flat and on some chairs felt pretty non existent.  I decided to use a thick, 2 inch deep foam for the seat padding which I bought from Amazon.  I also needed to buy a staple gun and the vinyl material which I also ordered from Amazon.  As the width of the material I chose to use was 1.4 meters I purchased 2 meters in length which gave me enough fabric to cover all 4 seats.

The first task I had was to remove the old fabric from the seats once the seat had been removed from the chair frame.  Sounds fairly simple doesn’t it?  This task took an age!  The old fabric had been stapled to the seat base with about a million staples per seat, and it wasnt just the sheer amount of staples used that made it a lengthy task, the staples were really tough to remove, some of them embedded into the wood quite deeply.  I used a screwdriver to lever the staples out one by one.  Once the staples had been removed I could see that the seat padding was made up of bits of milled material and foam had been used around the edges of the seat to make them less hard.  The foam had disintegrated fairly badly and had in many places turned to dust.  I had to carefully remove the fabric and use a Hoover to clean up as I went along.

The foam pads that I had bought were slightly bigger than the seat bases which meant I needed to cut the foam down to size.  as the seats were not square I also needed to make sure that the foam shape matched that of the seat so I used the seat as a template and traced around them onto the foam with a sharpie marker before cutting the excess foam away with scissors.

Once the foam had been cut to size I then needed to cut the vinyl down too.  I cut the piece I had bought into 4 sections, one piece for each seat.  I then laid this down on the table with the facing side to the table and the underside of the fabric facing up.  on to this I laid the cut foam and then placed the seat on top.  From that point I was able to start securing the fabric to the seat using the staple gun.  I started in the centre of the front of the seat, then the back centre, making sure the fabric was taught and evenly stretched over the foam.  I then secured each side before trimming down the excess fabric and then continued to staple the fabric into place.  Once I reached the corners I chose to fold the fabric and tuck it in, creating a neat looking corner.  I had, on the first chair. attempted to be fancy and create rounded seat edged but it didn’t work particularly well and I ended up with excess fabric in one corner and an awkward looking seat covering.   In hindsight I think that if the foam hadn’t been so thick then that idea would have worked a lot better!

In the pictures above you will be able to see that I started with stapling the corners of the fabric first…this was the first seat that I covered where I thought that making the corners rounded was a good idea…it wasn’t!  And starting on the corners meant that the tension of the fabric was out which made it harder to get the fabric to lay nicely over the foam.  On the other seats I secured the fabric in the centre of the sides and worked front centre 0 back centre, then both sides in the centre before working my way along the rest of the sides and out towards the corners.  Unfortunately, I forgot to take any more pictures of the full method I used….

Next week I will be showing you the completed chairs and the fun decoration I have added to the chairs!

The Story Behind My Blog Name

I chose to call my blog “My Colourful Life” as I wanted the title to encapsulate what the blog was about.  I decided that I wanted a blog where I could share my life, my art, my home, things I like and dislike, wish lists, hints, tips, advice, recipes and anything else that I fancy writing about…I guess you could call it a lifestyle blog!

I thought about lots of different names for my blog and settled on “My Colourful Life” as I love colour, my home and clothes reflect that.  I also chose “Colourful” as I don’t think anyones life is dull, everyone has a story to tell and interesting things that they can talk about regardless of what they do day-to-day and I felt that this word was really summarising who I am and what I want for my blog to be… a colourful story of me and my life.

When I asked people for a word to sum me up, many people chose colourful, I don’t know whether that is because I like wearing colourful clothes or dye my hair bright colours or what the reason was, I should ask them really.  My Colourful Life represents me and my hobbies, interests and ideas.

The UK part of my blog site name is because I live in the UK and I wanted that to be part

Upcycle Project – Dining Chairs (Part 2)

In last weeks post I told you guys about my dining chair find and the idea I had for upcycling them, todays post is about prepping them and painting them.

I decided that I was going to paint the chairs in different colours and change the seat fabric to white instead of going with white chairs and coloured seats.  I wanted to match the colours of the chairs to storage boxes in my dining area – pink, blue, yellow and white, however, I thought that having one fully white chair may look a bit odd but I was not really sure what colour paint to choose instead.  I decided to head to B&Q and see what sort of colours they had and what stood out to me.  I chose B&Q Colours range and bought tester pots in Playful Pink, Buttercup Yellow, Tropez blue, and lastly, instead of white I chose Green Apple.

Before painting I needed to prep the chairs by removing the varnish from them so that the paint would adhere properly.  Unfortunately I learned this the hard way as all I did for the first chair I painted was to “rough up” the varnish rather than remove it completely, the paint didn’t take very well and still, in certain lights looks patchy now.  I decided to remove the seat to make the process of sanding a bit easier and managed to remove the seat from the chair frame fairly easily, all I needed to do was flip the chairs upside down and undo 5 screws then lift the seat off.  Once the seat was off I was able to start sanding the chair frame down.  I used an 80 grit sandpaper and sanded each chair back to the wood in the garden.  Sanding is a lot messier than I anticipated and after being covered with dust and having to wash so many clothes I figured it would be better to wear my overalls for the job!  I worked on one chair at a time so that the screws and seats didnt become muddled as I wasnt sure if all the screw holes would match up on each chair.

There are a few things I learned about sanding while undertaking this part of the project (aside from wearing overalls…) and one of them is to sweep up immediately after you have finished otherwise the fuzzy “helper” will go and lie in the dust you have created and get covered!  The other thing I learned was that sanding is a lot more time-consuming than you imagine!  I had expected to clear the varnish from one chair in around an hour… in reality it took more like 4 hours to remove all the varnish per chair.

Once the sanding was finished I was able to start painting.  I started with the yellow first as I was going to be using the same brush for all chairs and washing it out between colours.  Starting with the lightest colour first means that there is less likelihood of paint to be ruined through colour contamination should the brush not be cleaned thoroughly.

This slideshow requires JavaScript.

Aside from the yellow chair needing several layers of paint and still being patchy now (due to the varnish not being stripped completely) I’m pretty happy with how the chair frames turned out and the paint colours I had chosen.  The paint is a matt finish and I used 3 tester pots per chair, did 2 to 3 coats per chair (the yellow chair took 5 pots and a lot more coats of paint) and they were fully dry by the following morning, touch dry within 20 minutes.

Next week I will be sharing the upholstering part of this project!

Mental Health and Me

img_0053-1

In a time where mental health is spoken about daily, by the hour and by the minute and in a time where there is, or should be greater understanding of the struggles and difficulties of others it can still be really hard to talk about our mental struggles.  And there is still a sense of shame about talking about our problems and also a worry that we will be defined by our illness or, even worse, treated differently because of it.

I’m writing this as I have recently been diagnosed with anxiety, stress and low mood, and consequently I have been advised to take a break from work and to start taking tablets to help me feel better.  I also have Aspergers which is part of the autism spectrum which means I process things a bit differently to others and certain things can cause me stress and anxiety on a day-to-day basis.  Normally I am pretty good at dealing with day-to-day stresses, whether it be too much noise, the lights being too bright, lots of things going on, lots of different things to do, worrying about whether I am doing things right, interruptions, the list of things goes on and on….  I have developed coping strategies for most stresses that I encounter and on the whole they seem to work.  Well, they have done until recently…I started to notice that the coping mechanisms that I normally implemented were not working so well…making lists and prioritising what needs to be done usually stopped me from panicking but I noticed that faced with several tasks to do, at home or work, I couldn’t work out what to prioritize and started to feel like I couldn’t breathe as there was “too much to do” and that I couldn’t complete any of it.  I found that I couldn’t concentrate, following conversations was becoming hard work, the background noise becoming too distracting and as loud as the person talking to me, even coming home to the relative silence of my home felt like sitting in the middle of a football pitch at half time.  I couldn’t read my book, I lost where I was and kept reading the same sentence or paragraph over and over, or forgetting what I had just read and having to go back a page to re-read it.  Even sleep, the one total shut off from the world wasn’t helping, I was waking up after having nightmares, sweating and gasping for breath, or lying there, so totally drained of energy yet unable to sleep as my mind just kept going over things that had happened. should have happened, could have happened, might happen…

And while all this was happening my skin was suffering too…I broke out with eczema on my face – on my forehead – right.between.my.eyebrows.  (Thank you body for giving me something else to add to my stress and worry list…).

I eventually, after months of pretending I was fine (I sort of made myself believe that if I got up and put a smile on and managed to go to work, I couldn’t be that bad and that it was “all in my head” and that it was just me…) went to the doctor.

The doctor that I saw went through a load of questions with me about my life, feelings, mood, work, sleep and eating habits along with lots of other questions.  He said that my eczema outbreak had been caused by stress and that he thought I was dealing with high levels of stress and anxiety based on my answers to his questions and how he read my body language.  He gave me a prescription for Sertraline tablets which will increase serotonin levels in my brain and make me feel better in due time.

I’ve now been taking the medication for a month or so now, originally I was on half a tablet each day which was then upped to a full tablet every day.  The side effects are not that good, I’ve felt sick, dizzy, hot, cold, thirsty, not hungry, my concentration levels are still really low, following anything on the tv or reading is really difficult and I can’t decide whether it’s the meds or the stress and anxiety still.  I have days where I really don’t feel like leaving the house or even seeing anyone and just existing in my own bubble, though I feel like that sometimes anyway because of my aspergers (though that sort of feeling comes after time spent with too many people and being a bit sensory overwhelmed…).  It’s hard to know what is caused by the tablets, what is stress, anxiety, aspergers, or me.

Sometimes I feel like I am just this bundle of diagnosis’ and it can be hard to sift through what is what to the extent it can become exhausting and overwhelming.  Sometimes I wonder if I am becoming my diagnosis/illness or is it becoming me?  Sometimes I just feel really lost in it all and wonder if I’ll ever feel “normal”, whatever that is?

I do  know that I am really grateful to my family and friends who I am able to talk to and who accept me for me.  I’m sure it can be difficult to converse with me at times,  I am not particularly good at explaining how I’m feeling either or putting words to what I’m thinking or feeling, so explaining how I feel can be hard work.  I’m also greatful that the doctor that I have been seeing is really patient and understanding, he doesn’t try to put words into my mouth, he sits and listens or will ask more questions to get a full picture of it all.

There is no shame in seeking help for whatever is going on in your mind, whether it is speaking to a relative or friend, a doctor or health worker, or anyone who you can trust.  If you notice that you are struggling with things then reach out and talk to someone.


Upcycle Project – Dining Chairs (Part 1)

A little while ago I sort of, nearly finished a upcycle project I have been working on.  And when I say “sort of nearly” I just mean that the majority of the hard work has been done and to any other person the project would look to be complete, but, I have more teeny things I would like to do in order for me to feel that the project has come to a close.  The project I am referring to is my dining chairs.

When I moved in to my home I had a dining table but no chairs, which in turn meant nowhere for guests to sit should I decide to invite anyone over for food unless sitting on the sofa and balancing a plate on your knees is acceptable in any circumstances other than when you are alone.  I started searching on Facebook, (who happen to have introduced a nifty little feature called “Marketplace” which seems to round-up any selling adverts from groups and put them all in one place which you can search on by either selecting certain categories or adding your own search terms), for dining chairs or chairs of any kind that I could use as substitutes.  I found some pretty decent looking plastic school chairs that I thought would be ok, they were orange which I loved and free too!  I messaged the seller but he didn’t want to let me have 4 of them, he had 36 to get rid of and wanted them gone en-mass.  I contacted a few other people who had chairs up for free but either they had already been collected by someone else or else I had no reply.  I sort of gave up looking and had decided that eventually I would probably have to buy some which is when I found “the ones”….

I can’t remember what I was looking for on Marketplace, all I know is that I wasn’t looking for chairs, but an ad caught my eye purely because the chairs in question reminded me of the ones my Mum and Dad had when I was growing up…they had the same shape to them, the same fabric, the same colour varnish, the only thing that was different was the back rest of the chairs, the ones in the ad had low backs where the ones Mum and Dad owned had high backs.  Out of interest I clicked on the ad and found that the owner was giving them away for free!  I sent a message and collected them later that day.  1582

I’ve got a white table and the rest of the furniture in my dining area is white so having brown and orange chairs wasn’t really going to match very well.  I decided that I would re-paint the chairs.  My initial idea was to paint the chairs white with a possibility of renewing the fabric on the seats, I was going to pick out similar colours to boxes I have in my storage unit that are pink, blue, yellow and white.  I changed my mind about having white chairs with coloured seats as I found it hard to find fabric in colours I was happy with or that weren’t mega bucks and out of my price range.  After a bit of extra thought and research into costs I decided that I would paint the chairs different colours and chose a white vinyl fabric to do all the seats with.

Next week I will be sharing the first part of the project with you!

Room Divider

The downstairs of my home consists of a front door that opens onto a narrow hallway with a door that leads into the living area.  The living area consists of 2 rooms that have been knocked into one with a bit of an archway separating the 2 spaces with a kitchen right at the back that leads onto my garden.  I love the main space, it feels big and airy and light, and I love that even though it is one big space it still manages to hold the definition of 2 separate spaces so well.

Having the space set up as 2 separate rooms, the main “living room” area at the front of the house – where watching tv, sitting and relaxing, chatting with friends, reading takes place, and the “dining room” area towards the back, nearest the kitchen, made the most sense to me.  I liked the idea of having areas defined by their use and making the most of the archway between what was the partition wall at one point.  I started to think about creating a proper divide for the space, the idea that I could close off one part of the space if I wanted for privacy or if it got chilly in winter and I wanted the space to feel more cozy seemed really appealing.  At first I thought about using my Ikea Kallax Unit to divide the space and had seen some really neat ideas using units in this way on Google, however I was worried that it could make moving between areas awkward, that I would lose floor space in one of the areas and that it would look more clumsy than cozy.

I settled on the idea of using material to divide the space, something similar to curtains, not only would it be cozy in the winter, it would be tactile and a playful addition to the pompoms Id already added to the space.  I thought that more texture and print would fit together perfectly.  I found just what I was looking for one evening on Amazon…  I knew that I didn’t want anything to heavy as it would be a pain to hang, I also didnt want fabric that was too thick as I wanted them to be easy to clean, wash and dry.  I also didn’t want anything to plain or “traditional” as it wouldn’t fit my style.  What I wanted was something that was bright, patterned, fitted with the colours of the room, was a little bit hippy, easy to care for and even easier to hang and live with!  I love the mandala print of these hangings, and the colours too, they seemed perfect to me.  I was a bit unsure, once they had been delivered as the colours were not as bright as I had imagined or seen in the listing but decided to hang them and see what they looked like anyway…

I hung these with Command Hooks and some pegs for the short-term, though they have been hanging since July and I’ve not changed the hanging method yet, so that may not change!

I’m really happy with the space divider, using hangings to create the divide has worked out really well, they have added texture and colour as well as being a privacy screen when needed though I have not really used it to its full capacity –  the curtains mainly stay open but as it gets colder and the nights get darker that may change!  And despite my reservations on the colour difference when I recieved them, I’m liking them a lot, they are not overbaringly bright and garish and really go well with the rest of the room and the decor!